Intune to configure one VPN connection to reach your Azure and on-premise

This article describes you how to configure an Azure VPN Intune profile. This profile will contain the configuration about the Azure VPN Point 2 Site.

The scenario is the following. You have established a VPN between your on-premise and Azure (with BGP routing), and now you want with your laptop access the resources in both places with only one VPN connection. This VPN connection will start automatically without any prompt when you are outside your company.


STEP 1 – Configure the Azure VPN P2S

Go to your Azure Virtual Network Gateway, and select the tab « Point-to-site configuration »

Enter an IP range (not in conflict with other routed networks), this range will be used by your remote laptops

Select « Azure certificate » to work without any prompt. You need enter the name of your ROOT Certificate authority, and the « public certificate data » coded in base64.

When the configuration is finished, download the VPN client, and extract the files inside the ZIP archive.


STEP 2 – Get the informations

From the data you get, please open the GENERIC folder and open the VPNSETTINGS.XML

Look for the value of <VpnServer>, looks like « azuregateway-xxxxxx.vpn.azure.com« . This value is the Azure VPN Server name

Additionnaly, we need to identify the SSL Server certificate thumbprint. The only way that is found, if to create from scratch on your Windows 10 computer a new VPN connection, by entering the corresponding informations.

When open a PowerShell console and type the following command

$vpn = Get-VpnConnection -Name “test connection”
$vpn.EapConfigXmlStream.InnerXml

then copy the output, and consider it as the XML configuration.


STEP 3 – configure your Intune profile

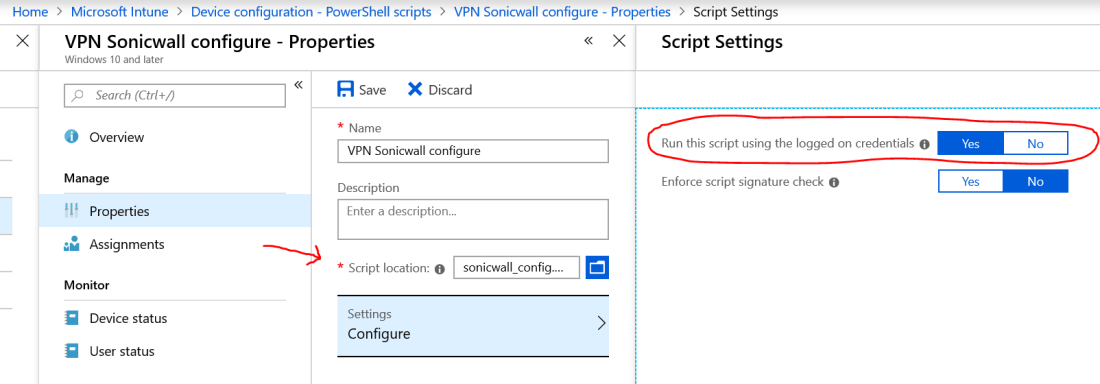
Create a new Intune configuration and select the VPN profile.

Enter the Azure VPN Server name on the « Servers » list. Set the description you want.

On the parameter « EAP XML », you can paste the previous XML configuration


Finally, navigate to the next parameters on the Intune profile and configure what is suitable for you, like the Split tunneling and the Trusted Network Detection.

Hope you enjoyed


Azure Policy – VM password requirements

When creating a Virtual Machine in the Azure environment, you have to follow some requirements in terms of password lenght. By default Microsoft enforce 12 caracters. But what happens if your corporate policy requires 20 or 25 caracters ?

To achieve that, you can implement an Azure Policy that will ensure when a new VM is created, your corporate policy will be enforced (only if more restrictive that Microsoft default)

Here you will find the code to create your custom policy. This sample specify the requirement of 20 password characters or an SSH Public key for Linux machines.

Hope this will help you to achieve more !


   « policyRule »: {
      « if »: {
        « allof »: [
          {
            « field »: « type »,
            « equals »: « Microsoft.Compute/virtualMachines »
          },
          {
            « not »: {
« anyof »: [
                {
                  « value »: « [greaterOrEquals(length(field(‘Microsoft.Compute/virtualMachines/osProfile.adminPassword’)), 20)] »,
                  « equals »: true
                },
                {
                  « field »: « Microsoft.Compute/virtualMachines/osProfile.linuxConfiguration.disablePasswordAuthentication »,
                  « equals »: true
                }
              ]
            }
          }
        ]
      },
      « then »: {
        « effect »: « deny »
      }
    }

A new era has come, the end of passwords

Last week, Microsoft just released the public preview of the « password-less login »

Till last week, this functionnally only works with « Microsoft accounts ». Now Microsoft has push this technology to « Azure AD », which means you can use it on your Enterprise with Azure and Office 365. Instead of using a password, you can only use USB or NFC security key !

To enable this feature, you should follow a few steps decribed bellow. It’s very easy.


Requirements

Please, be sure that you have a « security key » which is compatible FIDO2.

Personnally I’m using the Yubikey 5

https://www.yubico.com/

yubikey-5-family-720x720

Use a web browser like EDGE, but be sure that it is up to date. Don’t try to enroll with a « private session » or « icognito ». The process will fail with the user enrollment.


STEP 1 – Enable password-less feature on Azure AD

Go to your Azure Active Directory and select « authentication methods ».

Enable the feature « FIDO2 Security Key » for all users, or a subset of users.

Capture5


STEP 2 – Enroll your first user


Now the feature is enabled on your tenant, you can proceed to enroll your first user.

With your selected account, go to your azure user profile

https://account.activedirectory.windowsazure.com/

and go to « Edit security info » and « Add Method« , select « Security key »

Capture6.PNG


then select if your key is connected throught « USB » or « NFC »

Capture2

Finally, you will be prompted to enter your PIN and select the name of the « security key » in case you have multiple.


STEP 3 – Login with your Security Key


You are now ready to login without any password, only with the help of your security key 🙂

You can test it by going to the Azure Portal, or Office 365 apps. On the login page just select « Security Key » directly on the page, or on the « sign-in options »

Please be aware of you can have multiple identities in one « security key », during the login process, after the PIN, you will be prompted to select which identity you want to use.


STEP 4 – Manage you Yubikey

If you are using the Yubikey, i recommend you to use the « YubiKey Manager » to manage everything arround the key, like the PIN, Reset, setup the smartcard and certificates, etc…

Capture8

Microsoft Intune – how to configure Sonicwall NetExtender VPN client

This article will explain you how to configure with Microsoft Intune the Dell Sonicwall NetExtender VPN client.

Step 1

Use this small piece of PowerShell script and customize it with your own parameters like the Sonicwall VPN Server

#Prerequisites : the Dell Sonicwall NetExtender should already be installed on the computer before to run the script
cd « C:\Program Files (x86)\SonicWall\SSL-VPN\NetExtender »
$VPNServer = « vpn.server.com »
$VPNDomainName = « VPN »
$VPNPassword = «  » #if you want to provision the password
## uncomment the next line if you want the VPN username equal to the computer name
#$account = $env:computername
## uncomment the next line if you want the VPN username equal to the UPN of the logged user
#$account = whoami /upn
.\NECLI.exe addprofile -s $VPNServer -u $account -p $VPNPassword -d $VPNDomainName


Step 2

Define in Intune the script deployment and assign the configuration to the « user »

Go to Intune, Device Configuration and finally to PowerShell Scripts

Enter the name for this script, specify the script location and don’t forget to set to YES « Run this script using the logged on credentials »

sonicwall


Step 3

After a successfully Intune deployment, you can start using the NetExtender, you just need to fill the password and click Connect.

Enjoy !

sonicwall1